Screener Recorder
Overview
The Screener Recorder is a Chrome Developer Tools Extension that records manual tests for automated playback in Screener, and enables users to debug Screener scripts locally.
Installation & Sign In
After installation, access the Screener Recorder by opening Chrome Developer Tools. An additional tab is added called "Screener Recorder".
You will need to sign-in with your Screener login, as the Screener Recorder syncs with your Screener account to access your latest projects and scripts.
Screener Recorder Panel
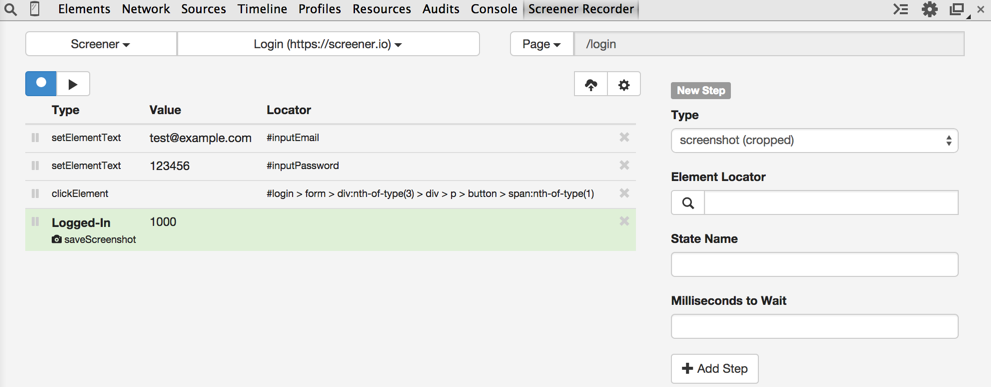
1. Project & Page Selection
The top of the panel shows the current selected Project and Page, with dropdowns allowing users to switch Projects.
Each recorded script is associated with a specific page.
2. Record & Playback Controls
Click the blue Record button to start recording actions on the selected Project and Page combination. This will record manual actions, such as clicks and text inputs. During a recording, custom steps can also be added such as capturing a snapshot.
Click the Play button to playback the recorded actions.
Both Record and Play controls reload the page to ensure it is in a clean, reproducible state. If there are existing recorded steps, the Record action will play through them first before starting the recording.
3. Recorded Steps
The steps table lists all recorded steps. Each row represents a single step, and consists of the step type, optional value and locator.
The left-side of each row has a pause icon which is used to set breakpoints during playback. Multiple breakpoints can be set, enabling users to step-through and debug steps.
The right-side of each row has an "x" icon which deletes the step.
All captured states are highlighted in green, with a bolded title, to make it easy to see when Screener will take a snapshot.
During playback, the current step being played is highlighted in blue.
- Remember to add a snapshot step for each UI state you want to validate. Snapshot steps need to be added manually.
- To re-order steps, simply drag/drop the step up or down the list.
- For ajax loaded content, use the "wait for element" step type to wait for either an existence of an element, or the visibility of an element. Use the jQuery pseudo-selector ":visible" in the element locator field to wait for an element to be visible.
- An explicit wait time can optionally be added to snapshot steps. This is useful when you want to wait for an animation to finish before capturing the snapshot.
- To add a new step after another step, click on the step you want to add the new step after. You will see the step details under "Update Step". Change the details by entering the new step details and click "Add After".
4. Save & More Options
All steps are automatically saved locally on a users machine until the Save button is clicked. Saving will upload the recorded steps to Screener, which will then play them in the test group's test run.
The Save button is only enabled when there are changes that have not been saved.
The More Options dropdown provides the following additional options:
| Clear All Breakpoints | Removes all breakpoints in steps. |
| Revert to Last Saved | At any point prior to saving, changes can be reverted to the last saved recording. |
| Delete All Steps | Delete all recorded steps. This only deletes steps locally, and will not apply permanently until Saved. |
| Logout | Sign out of current Screener account. |
5. Add/Update Step
The Step form provides users a way to add new or update existing steps. By default, the Step form is set to adding new steps.
To update an existing step, click on a row in the Recorded Steps table, and the Step form will update to reflect the selected step.
Many types of steps require the Element Locator field. To make it easier to find an element a user can click on the Finder "magnify-glass" icon, and then hover over an element and right-click to select. This will auto-generate a CSS Selector for the selected element.